|
||||||
|
||||||
|
Building
a lower replacement cowl for the PA-22-20 conversions. 1. For purposes of this discussion, consider the front edge as towards the oil cooler, the rear towards the cockpit, the air scoop as the inlet to the air box. Air outlet is the lower aft bottom that generally has a lip. Topside is the edge the latches are on, and the sides are the edge the three holes are to screw the cowl to the fuselage. 2. Remove the edge channels, and cowl latch brackets from the original cowl, clean and repaint. 3. Acquire a piece of .032 aluminum.(5052,2024,example) large enough to lay out the original cowl bowl side up, weigh the cowl down so it is flat as possible.Try not to scratch the new piece, because it is the surface to be painted. Using a fine point marker, scribe all around the outside edge of cowl to the bottom of the sides. Stop at bottom of the sides, just after they turn toward the front. Mark the screw holes and the latch bracket locations. 4. Remove old cowl and mark “outside” on new material. At the bottom where the sides started in towards the front, straight edge a reference line between the sides across the bottom. Using a square against the reference line, with one leg towards the front, at each side cutout location, scribe a line 7 inches towards the front and connect the two lines across the bottom with a 2 inch radius in the corners. This defines the air outlet. 5. Drill the screw hole locations and cut out cowl. Cut out latch bracket holes. 6. Locate the correct length edge channels for each topside, and rivet on channels and latch brackets on the “INSIDE” of the cowl. 7. The air scoop inlet location, which is “NOT” in the center due to engine offset, is determined by temporarily installing cowl at the bottom side holes, holding the cowl up against the airbox, and marking the side locations of the airbox onto inside of cowl, fore and aft. Layout cowl and square lines out to 6-inch width. Measure down these lines 3 inches from the front edge of cowl and connect. This is the front edge of the scoop cutout. Measure down another 11 inches to establish the rear edge of the scoop cutout. Now cut out this 6x11 inch piece. 8. Temporarily install on aircraft. Adjust scoop hole as necessary, allowing a little clearance at the airbox. The airbox and filter should protrude through the cut- out by about 2 inches. For the inside scoop, from the rear of the cutout, measure up to the top of the airbox where the filter attaches, record, and measure from the top of airbox forward to the front of scoop cutout, and record. For outside scoop, measure distance air filter protrudes +1/2 inch, and the distance from front of filter to rear edge of scoop hole, record. 9. Layout pattern for scoops. Inside scoop, start with rectangle 6 inches wide by the length from front scoop edge to airbox plus 1 inch. Rule out from the rear edge, (airbox end) the measurement from rear of cutout to top of airbox plus 1 inch and scribe an arc each side. Next, rule out from the front edge the fore/aft distance of the scoop cutout and scribe an arc on each side. Square the lines from the arc intersection to the anchor points. This appears to look somewhat like a butterfly pattern. On the outside long line and the front edge add ½ inch for rivet flange. Cutout scoop and brake into shape. Outside scoop made the same way with its dimensions except rivet flange is at the back instead of the front. The front edge of the outside scoop can be flanged over to create strength. Just add a little extra material for this. Install and rivet both scoops on the cowl at the same time. 10. Flange for the air outlet at the bottom is made from soft aluminum 3 inches wide the length of the cutout. Brake a 30 degree flange at 1 inch the length of piece. Rivet the 1-inch flange inside across the bottom. 11. Don’t be discouraged; this
takes about $30 worth of material and a days time as opposed to Univairs $550. With
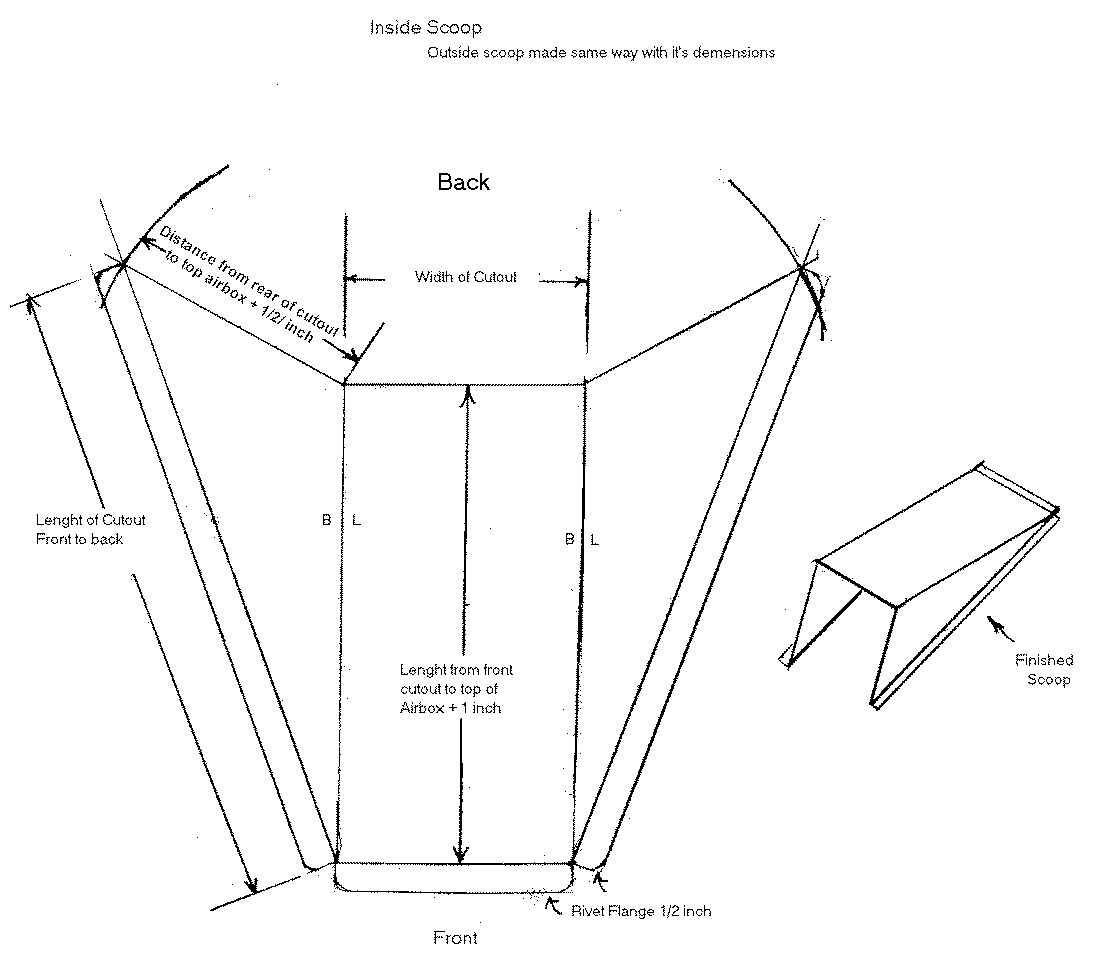
experience, I build this part in about 4 hrs. Good Luck Guys and Gals. Click here for picture of Inside Scoop Steve
|


